Laravel dynamic SMTP mail configuration
Hello friend…
It has been a while.
I have been very busy lately with work, open source and life that I didn’t find the energy to write a blog post. Despite having some good ideas, I wasn’t really in the mood.
Hopefully, I now have the energy and the subject to make a good blog post: let’s talk about Laravel and emails!
1. Laravel and SMTP⌗
1.1. Configuration⌗
Laravel SMTP Mail support is truly awesome and work out-of-the-box without requiring anything more than a few env variables:
MAIL_MAILER=smtp
MAIL_HOST=mail1.example.org
MAIL_PORT=587
MAIL_USERNAME=demo@example.org
MAIL_PASSWORD=foo
MAIL_ENCRYPTION=tls
MAIL_FROM_ADDRESS=no-reply@example.org
MAIL_FROM_NAME=Demo App
Note: The initial setup only requires these environment variables because the smtp mailer is already configured by default in
config/mail.php.
1.2. Creating an email⌗
Once everything is configured, creating an email is as simple as running this command:
php artisan make:mail Greetings
This command will generate a sample email in app/Mail/Greetings and you’ll just need to design it afterwards.
1.3. Sending an email⌗
Sending an email to a user with Laravel can be either done
- using
\Illuminate\Notifications\RoutesNotifications::notify:
$user->notify(new Greetings());
- or using
\Illuminate\Support\Facades\Notification::send:
Notification::send($users, new Greetings());
Note: the later syntax is especially useful when bulk sending emails.
See how simple it is? I wonder what would be the limitations.
Eh! What if we need to ‘whitelabelize’ our application. :-)
2. Dynamic SMTP configuration⌗
In our scenario, we have the need to whitelabelize our application:
each User will belongs to a Provider that will have custom SMTP settings. So when sending email to a user we need to
configure dynamically the mailer to use the SMTP credentials of his provider ($user->provider).
Can Laravel help us doing so?
After a bit of googling and reading the official documentation, there’s no out-of-the-box support for dynamic SMTP configuration, certainly because there would be 100x way of doing it, each way depending on your exact use-case.
So, we’re screwed?
Not yet, because Laravel allows us to tweak almost anything, so we just need to find our way.
2.1. Designing the models⌗
Here’s a quick visualization of our models:
namespace App\Models;

/**
 * @property Provider $provider
 */
class User extends Model
{
    public function provider(): BelongsTo
    {
        return $this->belongsTo(Provider::class);
    }
}
For the User model there’s nothing special: we only link the user to a Provider.
namespace App\Models;

/**
 * @property array $mail_configuration
 * @property Provider $provider
 */
class Provider extends Model
{
    protected $casts = [
        'mail_configuration' => 'encrypted:array'
    ];

    public function users(): HasMany
    {
        return $this->hasMany(User::class);
    }
}
The Provider model has many Users and has a mail_configuration field which is encrypted and that will contain the
SMTP credentials.
The email configuration will be stored as an encrypted JSON configuration. It will look like this:
{
  "host": "smtp.example.org",
  "port": 587,
  "username": "foo",
  "password": "bar",
  "encryption": "tls",
  "from_address": "no-reply@example.org",
  "from_name": "Example"
}
2.2. Digging down the internals⌗
Now that our models are ready, we must find a way to use the provider configuration to send the email. Let’s dig down in Laravel source code to understand how emails works:
Remember the two-ways of sending emails?
\Illuminate\Notifications\RoutesNotifications::notify\Illuminate\Support\Facades\Notification::send
What we need to do is find the common path between these two methods, and see if we can override some behavior in there.
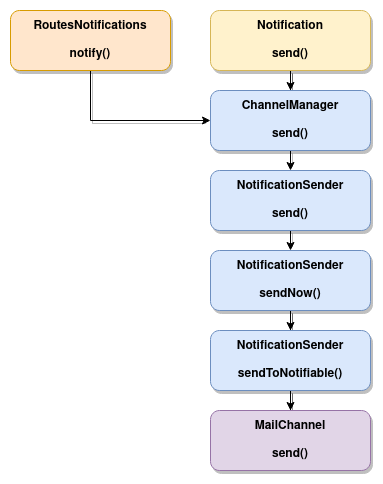
As you can see here, the methods share the same execution path that end up
calling \Illuminate\Notifications\Channels\MailChannel::send. So how can we hook up into this path?
The answer lies in \Illuminate\Notifications\NotificationSender::sendToNotifiable:
protected function sendToNotifiable($notifiable, $id, $notification, $channel)
{
    if (! $notification->id) {
        $notification->id = $id;
    }

    if (! $this->shouldSendNotification($notifiable, $notification, $channel)) {
        return;
    }

    $response = $this->manager->driver($channel)->send($notifiable, $notification);

    $this->events->dispatch(
        new NotificationSent($notifiable, $notification, $channel, $response)
    );
}
As you can see this method is looking for a driver to use with the $channel and finally calls the send()
method. So what we can do is registering a special SMTP driver that will use dynamic SMTP settings.
Fortunately registering a custom driver is a common use-case and there’s a straightforward way.
2.3. Creating a custom MailChannel⌗
namespace App\Notifications\Channels;

class ProviderMailChannel extends MailChannel
{
    public function send($notifiable, Notification $notification)
    {
        // TODO: override the SMTP configuration
        parent::send($notifiable, $notification);
    }
}
2.4. Registering the ProviderMailChannel⌗
All we need to know is extend (i.e: register a custom driver creator) for the mail channel.
This way when an email is sent it will be sent using our ProviderMailChannel.
namespace App\Providers;

class AppServiceProvider extends ServiceProvider
{
    public function boot()
    {
        /** @var ChannelManager $channelManager */
        $channelManager = $this->app->get(ChannelManager::class);
        $channelManager->extend('mail', function (Application $application) {
            return new ProviderMailChannel($application->get('mail.manager'), $application->get(Markdown::class));
        });
    }
}
2.5. Creating a custom Mailer⌗
Now that we are hooked up into the mail sending flow, we need to actually send the email. For doing so we need to instantiate
custom \Illuminate\Mail\Mailer instance that will be configured using the provider settings. To register such dynamic
configurable service we will use the power of
the Service container.
namespace App\Providers;

class AppServiceProvider extends ServiceProvider
{
    public function register()
    {
        // Register a custom mailer named `custom.mailer` that will receive his configuration dynamically
        $this->app->bind('custom.mailer', function ($app, $parameters) {
            $transport = new Swift_SmtpTransport($parameters['host'], $parameters['port']);
            $transport->setUsername($parameters['username']);
            $transport->setPassword($parameters['password']);
            $transport->setEncryption($parameters['encryption']);

            $mailer = new Mailer('', $app->get('view'), new Swift_Mailer($transport), $app->get('events'));
            $mailer->alwaysFrom($parameters['from_address'], $parameters['from_name']);

            return $mailer;
        });
    }

    public function boot()
    {
        /** @var ChannelManager $channelManager */
        $channelManager = $this->app->get(ChannelManager::class);
        $channelManager->extend('mail', function (Application $application) {
            return new ProviderMailChannel($application->get('mail.manager'), $application->get(Markdown::class));
        });
    }
}
Now we can instantiate this custom Mailer by doing the following:
$mailer = app()->make('custom.mailer', $configuration);
// do something with $mailer
Where $configuration is the custom SMTP configuration.
2.6. Plug the custom Mailer into the ProviderMailChannel⌗
Finally, all we need to do is to read the Provider mail configuration
and use it to instantiate our custom.mailer and then, use it to send the actual email.
namespace App\Notifications\Channels;

class ProviderMailChannel extends MailChannel
{
    public function send($notifiable, Notification $notification)
    {
        $message = $notification->toMail($notifiable);

        $mailer = app()->make('custom.mailer', $notifiable->provider->mail_configuration);
        $message->send($mailer);
    }
}
3. Conclusion⌗
That all folks. You are now capable of sending email using dynamic SMTP credentials based on the use-case.
Happy hacking!